


Secret Stories®
Phoneme Grapheme Word Mapping Velcro Kit
with The Secret Stories® Digital Stickers Template.


What you will need:
1.The TPT Secret Stories® Science of Reading Phonics Centers with Phoneme Grapheme/ Word Mapping Template
2. A great pair of scissors.
3. Clear Velcro. (approximately 144 pairs per kit)
(click this link to get the brand of Velcro that I use)
4. A File folder to mount the MAT to.


8.5x11 Template from TPT:
8.5 x 11 Secret Stories
Cut-Out Pieces
8.5 x 11 Secret Stories
Grid-Velcro Mat


8.5 x 11 Secret Stories
Velcro Kit Fits in a File Folder!


Cut-Out Pieces!
Directions
Step 1 (optional)
Step 1: Put on some incredible music. Music that calms you and makes you happy. Don’t allow yourself to get stressed out making these Kits. Make them with love, knowing your students will
be benefiting from your labor. I love piano instrumentals. This is one of my favorite playlists: https://www.youtube.com/watch?v=EuA_9DZsOY4

Step 2
if you want your 11x8.5 MAT (x2) to be placed on a file folder, do that before laminating.
Velcro Kit!
Cut-Out Pieces!
TPT 8.5"x11"Printable Template
MAT
Cut-Out Pieces


8.5 x 11 Secret Stories
Cut-Out Pieces
8.5 x 11 Secret Stories
Grid-Velcro Mat
Step 3
Gather your scissors and get ready to cut your cut-out pieces.

I like to cut out 1 strip at a time.
Then I lay the strips out to be cut into their final squares later. (I placed my cut-out strips onto pink paper so you would be able to see them clearly)
You may find a method you prefer more.

Cut each row out and place
them in order.
Example:
Step 4
Cut your pieces into squares and place them back in order for easier assembly.

Cut each row into their final
Velcro Squares and
place them in order for
easy assembly of Step 5.
Step 5
Once your pieces have been cut, (dance and clap and celebrate). It is now time for Velcro.
I place the clear/hook side Velcro on the MAT ONE ROW AT A TIME.


Step 6
Next, carefully place the fuzzy Velcro (loop side) over the top of the clear /loop side Velcro (sticky side up so that you can stick the Secret Stories to them) ONE ROW AT A TIME. You don't need to press it down, just lightly place it on top so your finger doesn't get stuck. I touch only the sides of it as I place it down. The pressing down will come in step 7.

Step 7
After the fuzzy Velcro (loop side) has been added, it’s time to press your cut-out pieces carefully on top. I hold down and press hard to make sure they stick well.


Recap of steps 5-7
Repeat Steps 5-7 until all of your Secret Stories Velcro pieces are added!
Step 8
Add clear or white Velcro dots to the "Focus Phoneme, Map It, and Build It" sections on any template you are planning on using. (white is ok for this section because it does not need to be transparent) * Make sure to use the NON fuzzy side (hook side) of the Velcro pieces so that your FUZZY (loop side) Velcro Secret Stories graphemes will stick!


Add (the hook side)
Velcro to the
work section
of your Mat(s).
Close up
Congratulations!
Your labor of love is complete!

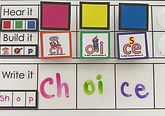
Example of a Finished Kit!


Secret Stories®Phoneme Grapheme
Mapping Velcro Kit!!
For more on Secret Stories® visit www.TheSecretStories.com and be sure to join the
Secret Stories® Group: Infusing Reading Science with Brain Science on Facebook!


